Showing posts with label windows. Show all posts

Sunday, January 4, 2015

Videos Added To Serviio Do Not Appear In Library

Recently my DLNA setup based on Serviio version 1.4.1.2 running under Windows 7 inexplicably started to not recognize newly-added videos. When attempting to browse them via my Samsung smart TV, the latest entries did not appear.

Serviio console, showing status and devices configured for streaming.

I hadn't dramatically changed the file and folder structure from which Serviio streams recently, nor had I made any huge changes to the configuration of Serviio nor my server. Finally though I found a solution which seems to have done the trick. It involved simply configuring Windows' file and folder permissions and file sharing permissions to allow the Everyone group to have read access.


Modifying Windows file and folder permissions to enable Everyone to have read access.


Modifying advanced file sharing permissions to give Everyone read access.

Some users in the Serviio forum suggested giving the PC's local system account read access to one's video repository. I tried this, but after restarting the server and the TV, the situation remained the same. I later discovered a blog post which clarifies the difference between Everyone and other authenticated accounts in Windows:
The Everyone group includes all members of the Authenticated Users group as well as the built-in Guest account, and several other built-in security accounts like SERVICE, LOCAL_SERVICE, NETWORK_SERVICE, and others.

The "local system account" I'd read about in my research on Serviio's forums might not be the same one I gave read access to, so I tried simply giving the Everyone group read permissions, and upon forcing Serviio to refresh its database of videos, it began churning through them and finally resulted in them being visible again via the TV.

One drawback to doing this is that anyone else on my LAN would be able to access my video collection, given that the folder is now openly shared to essentially "everyone". I might need to ramp up the frequency with which I routinely change up my WiFi passphrase, but in the end this is no big deal.


Thursday, February 20, 2014

FocusMonitor Identifies Processes Stealing Focus

Recently I've been having issues with some process stealing focus from the application I'm working in.

Like I'll be in Visual Studio or Word or Waterfox (a 64-bit performance focused build of Firefox) and suddenly focus is swapped for a split second and whatever word I'm typing gets cut off or a button I'm clicking isn't.

I found a very helpful post by Matt Gertz from some years back where he provides some VB.NET code for an application that can monitor processes that steal focus from it. I'm more of a C# guy myself, so I've run with Matt's core logic and created a 32-bit C# application in Visual Studio 2010 which provides similar functionality. It will also let you copy the log info to the clipboard to paste wherever for further examination.


I call it FocusMonitor, and you can download the source code.


Sunday, February 2, 2014

Cannot Install Windows Updates

My Windows 7 install inexplicably began to have issues with installing updates.

Service pack 1 installed fine using an installer, but other incremental updates consistently failed, they would download but they'd be skipped by Windows Update and reported as having not been installed.

One fix involved deleting a folder and letting the update process recreate it, specifically this one:
C:\WINDOWS\SYSTEM32\catroot2

This folder contains part of an internal Windows database which it uses to track updates, and a log file, dberr.txt, which was rife with error messages like these:

CatalogDB: 6:27:32 PM 2/1/2014: catdbsvc.cpp at line #3454 encountered error 0x8007000e
CatalogDB: 6:27:32 PM 2/1/2014: catadnew.cpp at line #1915 encountered error 0x8007000e
CatalogDB: 2:16:29 PM 2/2/2014: catdbsvc.cpp at line #969 encountered error 0x8007000e

 
Interestingly, the error 0x8007000e was frequently returned as a response in the failed attempts to update.

Based on this seemingly corrupted database folder, I decided to try deleting it and then have Windows recreate it by taking the following steps, and now updates are again able to be installed.
  1. Open a command prompt with administrator access.
  2. Stop the Cryptographic Services, which normally has a lock on the above mentioned folder, by typing this: NET STOP cryptosvc
  3. Rename (or, if you're brave, delete) the C:\WINDOWS\SYSTEM32\catroot2 folder.
  4. Start the Cryptographic Services by typing: NET START cryptosvc
  5. Run Windows Update, and then have it download and install one or more updates to verify that it does so successfully.

After doing this I was able to download and install the latest updates successfully.


Saturday, January 11, 2014

Manually Invoking TRIM To Restore SSD Performance

I've had my SSD for almost two years now and although Intel's SSD utility shows it as having plenty of life remaining, I'd been reading up on TRIM and the details of how SSDs manage their space.

TRIM is a kind of garbage collection for SSDs, for although SSDs don't experience data fragmentation of the sort that hard drives do, there is clutter which can accumulate over time and negatively affect performance.

I found a forum post on "refreshing" SSD performance which mentioned a tiny utility called ForceTrim, which tells your SSD to perform TRIM processing and smooth out the "wrinkles" in its data storage.


Using CrystalDiskMark to benchmark my SSD performance before running ForceTrim, I saw performance close to what it was when I first started using this SSD as my operating system drive:

BEFORE - Seems pretty close to new SSD performance.


I then opened ForceTrim, selected my C: drive, and clicked TRIM. As the tool advised, I waited around five minutes for the drive to "recover", then reran the benchmark:

AFTER - Modest gains pretty much across the board.

It does appear that manually invoking TRIM can provide a modest boost in read and write performance for an SSD. Perhaps in the SSD age, forcing TRIM once in a while is the "new" defrag?


Wednesday, May 30, 2012

Firefox Performance Problems

Lately I've noticed Firefox seems to be lagging as of the latest release of version 12. 

Since my earlier post regarding setting Firefox up to utilize CPU affinity in Windows, things have been manageable, but lately a familiar flavor of failure seems to have crept back into this latest release.

If I leave Firefox open and running overnight with my usual group of a dozen or so tabs open, as soon as I resume activity in the morning, I notice in Task Manager that Firefox has one of my system's CPU cores at 100% usage, and has well over 1.7 GB of system memory in use, far more than what typically ranges from 400 to 700 MB on an average day.

Any given morning, thanks to Firefox.

More often than not, once I clear this CPU usage spike by ending the firefox.exe process, when I reopen Firefox I'm greeted with tabs notifying me of add-on updates that have been applied. 


This same issue seemed to be absent as of, say, version 10, but appears to have recently reemerged, at least in my experience on several different PCs running Windows 7.

A common thread among established users on the Firefox support forum points to the various add-ons users have installed. Clearly, many of them say, this is the culprit, and the often the user is advised to open Firefox sans add-ons and attempt to reproduce the problem by enabling add-ons one by one and testing after each to determine which might be the culprit.

I have no desire to invest the time and effort in something that I think developers and analysts at Mozilla should be hammering out themselves. It seems that if you release a platform on which users will develop add-ons, there should be safeguards in place to prevent poor coding from disrupting the integrity of the browser's functionality.

That being said, if you have a 64-bit system, consider trying out Waterfox, a Firefox build which emphasizes performance and speed, and mitigates a lot of whatever lurks in Firefox's codebase that might be causing this excessive memory usage and lag.

Perhaps it's some insidious conspiracy to make it so that when your computer is otherwise asleep at night, Firefox will rear its head and ramp up CPU usage and therefore power consumption, making an impact, however small, on world oil prices, driving up costs and compelling people to bite the bullet and get off the grid with their own solar, wind, nuclear, or other alternative power source.

I've had crazier ideas!


Saturday, July 9, 2011

Create Shortcut to Executable using C#

I needed a C# method to create a shortcut to an executable and place it on the user's desktop in Windows.

I found a method to actually create the shortcut which utilizes the Windows Scripting Host object model. Most examples I found used a separate icon file for the shortcut, whereas I wanted to have the shortcut icon by default be the same one used by the executable itself.

First you must create a reference in Visual Studio to the Windows Script Host Object Model COM object as shown here:


Below is the modified method, where sLinkPathName is the path to the executable.

using IWshRuntimeLibrary

...

private void appShortcutToDesktop(string sLinkPathName)
{
     try
     {
          WshShellClass wsh = new WshShellClass();
          IWshRuntimeLibrary.IWshShortcut scShortcut;

          // Choose the path for the shortcut
          scShortcut = wsh.CreateShortcut(Environment.GetFolderPath(Environment.SpecialFolder.Desktop) + "\\shorcut.lnk") as IWshRuntimeLibrary.IWshShortcut;

          // Where the shortcut should point to
          scShortcut.TargetPath = txtFile.Text;

          // Description for the shortcut
          scShortcut.Description = "This is a shortcut.";

          // Location for the shortcut's icon
          scShortcut.IconLocation = sLinkPathName + ", 0";

          // Create the shortcut at the given path
          scShortcut.Save();
     }
     catch (Exception ex)
     {
          MessageBox.Show(ex.Message);
     }
} 

Line 22 sets the shortcut's IconLocation property such that it grabs the default icon for the executable, the same one that you'd expect to see if you created the shortcut manually.


Thursday, January 27, 2011

Improve Firefox Performance with Processor Affinity

Firefox seems to frequently stutter or lag while doing seemingly trivial tasks like scrolling or even typing following the most recent Firefox 3 update.
 
Enter the concept of processor affinity, which enables you to direct applications to utilize one or more specific CPU cores in your multicore system. I discovered a blog post where the author describes creating a shortcut in Windows Vista or Windows 7 which will execute a given application with a specific processor affinity configuration.


PROCEDURE

  1. Copy and paste to create a copy of your current shortcut to Firefox on the Desktop.
  1. Pick a single CPU core, in decimal, to dedicate to Firefox, according to the chart below. I chose CPU 3 on my quad-core system.
0001 = 1 (CPU 0)
0010 = 2 (CPU 1)
0100 = 4 (CPU 2)
1000 = 8 (CPU 3)

  1. In the Target box, copy and paste one of the following lines (the first for 32-bit Windows, the second for 64-bit), and change x to match the value you chose in the above step (change the paths as necessary if your Firefox lives in a different location).
C:\Windows\System32\cmd.exe /c start "C:\Program Files\Mozilla Firefox\" /affinity x firefox.exe

C:\Windows\System32\cmd.exe /c start "C:\Program Files (x86)\Mozilla Firefox\" /affinity x firefox.exe


  1. Click OK to accept the changes, then close and reopen Firefox using the modified shortcut.

Windows XP also allows for changing the processor affinity setting for a given process via the Processes tab in Task Manager, but this setting is applied only for that instance of the application, so you can't use the above method to have a shortcut which automatically sets the affinity every time. If you try it, you'll get this error message:

Invalid switch - "/affinity"

Fortunately, a freeware utility called RunFirst exists which will perform in a similar manner, except it will by default assign only the first CPU core in the system to have affinity with the application you're running it with. To use it, create a batch file to execute firefox.exe like this:
      RunFirst.EXE "C:\Program Files\Mozilla Firefox\firefox.exe"


Now, Firefox has its very own CPU core to use on my Windows 7 system, which is advantageous in that the other applications running on my system need only contend with one core being potentially monopolized by some CPU-expensive operations which Firefox initiates.

I tend to browse with many (read: dozens) of tabs open simultaneously, as well as a plethora of add-ons installed such as AdBlock Plus, DownThemAll, FireBug, GreaseMonkey, FoxyTunes, Stylish, FiddlerSwitch, and more. Mine is hardly a “vanilla” setup, and given that these various add-ons let alone Firefox itself are developed by a variety of developers with a variety of coding styles, even bugs, it’s entirely likely that I’m a victim of chaos, that an unfortunate confluence of events are conspiring to kick my browsing experience in the teeth. 

At least this way, I'm letting Firefox do it's thing on just a single core, rather than having it bleed over onto the others and potentially making my other running processes unhappy.

So far, Firefox seems to be significantly more responsive than before!


Tuesday, April 27, 2010

Create CheckBox Controls Inside A GroupBox Programmatically

I'm working on a WinForms app to interface with SQL server to grab parameters and other info for various objects. It uses a custom control I discovered on CodeProject to create a collapsible GroupBox control.

Say that I want to create a bunch of new controls based on the output of some SQL function or stored procedure. For example, the system stored procedure sp_databases returns a list of all databases on a given SQL server. 

In my collapsible GroupBox, I might want to create a CheckBox control for each database so that I can let the user choose which database to work on in the current session of the application.

To facilitate this, some pseudocode might be helpful:
  • Instantiate a new CheckBox object.
  • Does my GroupBox contain any other CheckBoxes?
    • NO: Set the CheckBox location so that it appears in the upper-left corner of the GroupBox
    • YES: Grab the X and Y coordinates of the last CheckBox contained in the GroupBox
  • Would the width of an additional CheckBox exceed that of the GroupBox?
    • YES: Set the new CheckBox X coordinate so that it aligns with the first CheckBox in the GroupBox, then bump the Y coordinate down by a set value.
    • NO: Place the new CheckBox to the right of the previous one.
  • Set the Text property of the newly-added CheckBox to a given input string value.

Along these lines, I created the method below, which takes a string as input representing the Text property of the newly-created CheckBox.

       
/// <summary>
        /// Create a new CheckBox control within a collapsible GroupBox, assigning input sName
        /// to the Text property.
        /// </summary>
        /// <param name="sName"></param>
        /// <returns></returns>
        private CheckBox CreateNewCheckBox(string sName)
        {
            int iExistingCheckBoxX = 0;
            int iExistingCheckBoxY = 0;

            int iIncrementX = 100;
            int iIncrementY = 20;

            CheckBox cbNew = new CheckBox();

            cbNew.Width = iIncrementX;

            if (cgbDatabases.Controls.Count == 0)
            {
                cbNew.Location = new Point(cgbDatabases.Location.X + 15, cgbDatabases.Location.Y - 50);
            }
            else
            {
                // Existing checkboxes, so get the Location of the last one.
                iExistingCheckBoxX = cgbDatabases.Controls[cgbDatabases.Controls.Count - 1].Location.X;
                iExistingCheckBoxY = cgbDatabases.Controls[cgbDatabases.Controls.Count - 1].Location.Y;

                // If the new control would overshoot the end of the container, bump it down.
                if ((iExistingCheckBoxX + iIncrementX) + cbNew.Width >= cgbDatabases.Width)
                {
                    iExistingCheckBoxX = cgbDatabases.Location.X + 15;
                    iExistingCheckBoxY = iExistingCheckBoxY + iIncrementY;

                    cbNew.Location = new Point(iExistingCheckBoxX, iExistingCheckBoxY);
                }
                else
                {
                    cbNew.Location = new Point(iExistingCheckBoxX + iIncrementX, iExistingCheckBoxY);
                }
            }

            // Set the Text property according to the input.
            cbNew.Text = sName;

            return cbNew;
        }


In the constructor of my WinForm app, as a test I used the collapsible GroupBox control's Add method in conjunction with the new method to insert a bunch of child CheckBox controls into parent GroupBox. 

        public frmMain()
        {
            InitializeComponent();

            cgbDatabases.Controls.Add(CreateNewCheckBox("CheckBox1"));
            cgbDatabases.Controls.Add(CreateNewCheckBox("CheckBox2"));
            cgbDatabases.Controls.Add(CreateNewCheckBox("CheckBox3"));
            cgbDatabases.Controls.Add(CreateNewCheckBox("CheckBox4"));
            cgbDatabases.Controls.Add(CreateNewCheckBox("Checkbox5"));
            cgbDatabases.Controls.Add(CreateNewCheckBox("Checkbox6"));
            cgbDatabases.Controls.Add(CreateNewCheckBox("Checkbox7"));
            cgbDatabases.Controls.Add(CreateNewCheckBox("Checkbox8"));
            cgbDatabases.Controls.Add(CreateNewCheckBox("Checkbox9"));
            cgbDatabases.Controls.Add(CreateNewCheckBox("Checkbox10"));
            cgbDatabases.Controls.Add(CreateNewCheckBox("Checkbox11"));
        }


The results are as I expect:


Advantages of this method include the ability to tweak the variables within the CreateNewCheckBox method to determine what the starting X and Y coordinates will be based on the Location of the GroupBox; if I move the GroupBox somewhere else in my form's design view, the code won't care, it will simply churn out the CheckBox objects based on the parent control's current position at runtime. Also, it prevents new objects from being created outside the visible width of the GroupBox.

Shortcomings include a lack of checking the height of the GroupBox; if a zillion controls are created within it, there's currently no logic to prevent them from being placed in the nonvisible area of the control. Also, I'm currently not analyzing the incoming string parameter to see whether I want to constrain the resulting object to a uniform height or width, which means a CheckBox with a huge label likely will not display its Text value correctly.

Speaking of dimensions, the method is currently not "smart" enough to roll with the punches in terms of variations in height or width of the resulting controls; it doesn't offer an easy way to make the child objects conform to specific patterns (e.g. the objects appear one after the next from left to right, not up to down or diagonally or some other order). These would need to be tweaked and tested manually to ensure the object labels remain intact, and the objects themselves remain visible and usable. A more elegant solution would be to have the method scrutinize the control to be created and its attributes and compensate.

Baby steps, but nonetheless I found this a helpful exercise in creating CheckBox controls at will within a parent GroupBox, and already am seeing ways in which I can improve this implementation. I wish to thank Jordan Hammond, creator of the CollapsibleGroupBox control from the article I cited above, and also Manoli's code formatter, which was used here to make the C# excerpts presentable.

Wednesday, July 8, 2009

Fake a Floppy That Holds GIGABYTES of "Data"


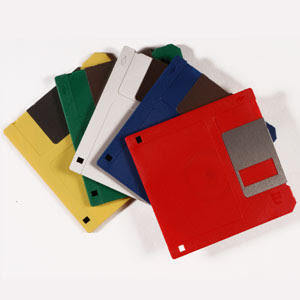
The venerable 3.5” diskette has become a relic of the past. In high school I remember using them daily to store my documents, images, even some games. Now, system builders will only offer them as an optional peripheral, if at all, in their new computers.

With this little hack you can give that humble little 3.5" disk gathering dust in your closet new life, messing with your friends’ heads a bit in the process. To accomplish this, we use a disk editor to fool Windows into thinking that its file sizes are far from normal!

Stuff you'll need:
  • Windows 2000 / XP / Vista
  • 3.5" disk drive
  • 3.5" diskette
  • a disk editor like Norton DiskEdit

According to this site, your typical 1.44MB, 3.5” floppy can hold up to 224 files in its root directory. What we’ll do first is create 224 tiny text files using a simple batch file.

Create a batch file containing the following line of text in a folder on your C:\ drive, let’s say C:\TEMP. Name the file "MakeFile.BAT" or whatever you like.

FOR /L %%G IN (1, 1, 224) DO ECHO I'm file number %%G. > A:\%%G.txt


Next, open a Command Prompt, change to C:\TEMP, and execute the batch file. After a few minutes, you’ll have 224 separate little .TXT files on the diskette.

Now you need to find a disk editor, which allows you to edit data on a diskette or most any other media at the bit level. For this example I use Norton DiskEdit, a very old but still useful sector editor.

Find yourself a copy of the executable, DISKEDIT.EXE, and save it to C:\TEMP, and then type DISKEDIT and hit Enter. If you’re using Windows 2000 or XP, you’ll likely encounter the following error:

An application has attempted to directly access an incompatible diskette format, which cannot be supported. This may cause the application to function incorrectly. Choose ‘Close’ to terminate the application.


We won’t be looking at the hard drive, so for purposes of this example you can safely click Ignore. From there you should arrive at the main DISKEDIT screen.


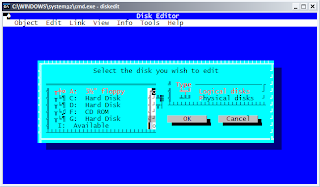
My system isn’t rendering this old DOS application’s fonts properly in windowed mode, but regardless you can use the arrow keys to ensure that the ‘3½” floppy’ and ‘Logical disks’ entries are selected and in red. Then, move to highlight the OK button and hit Enter to proceed.

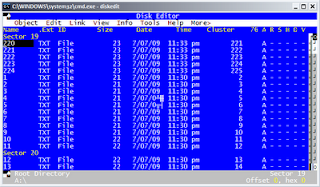
Your diskette drive should whir for a few moments, and one great feature of DISKEDIT will make itself apparent. The next screen will bring you to the FAT of the disk, listing the files you created above.


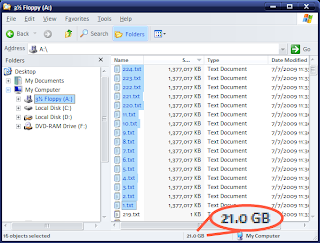
Now, move the black cursor so that it’s hovering under the Size column on the first row, you can use the arrow keys but hitting TAB will be quicker. Type 9999999999 (ten 9s), and then tap the down arrow to move to the next row. You’ll notice that the file size changes from a humble two digits to a value of 1,410,065,407 which is roughly 1.4 gigabytes.

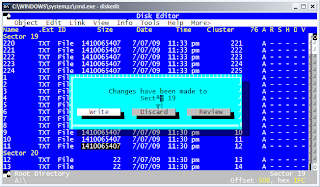
You can proceed to change the sizes of each of the remaining files, from 220 to 11 as listed above. When you tap the arrow key past the last file, you’ll get prompted to Write, Discard, or Review your changes. Arrow over so that Write is selected, then hit Enter.


Since DISKEDIT is open, it’s got exclusive access to your diskette. To view our handiwork so far, close the program, and then navigate to the diskette in Windows Explorer. The sixteen files we just modified now show themselves as taking up 21 GB of space.


You can either manually update the size of each file, or use a tool like the excellent (and open-source) AutoHotKey to speed up the process.

In the end, you’ll have a disk which, on the surface, says it’s got around 294 GB of data, but which in actuality contains just a tiny fraction.


Some caveats:
  • The files themselves will be unusable. Try to open them in Notepad, for example, and Windows will complain they're too big.

  • Changes you save to the files will override this hack. Save and overwrite any of the files and they'll revert to their plain old file size according to the file system rules.

  • The fake file size can go beyond 1,410,065,407 bytes apiece. Due to a quirk in Norton Diskedit, instead of ten 9s, you could input ten 7s and have each file be around 3.4 GB instead. I just chose the 9s arbitrarily because 9 is just, well, special. That's all, nothing else. Different disk editors may yield different results, and flexibility.

  • This trick won't fool p2p file sharing programs. I tried a few open-source variants using the DC++ protocol and each balked at the disk, wanting to have Windows run CHKDSK to fix the "errors". You'll just have to share those 500 GB of data the hard way to gain access to those l33t servers in Sweden, unless you know of a way to "cloak" the diskette's true nature from the application and the operating system.


Saturday, May 30, 2009

No Internet After Installing Vista SP2

I'd just noticed Vista service pack 2 had become available via Automatic Updates, and decided to take the plunge and update my Lenovo N100 laptop.

Upon rebooting, I was able to connect to other XP machines on my LAN, but not the internet.


I found a helpful newsgroup post where some other users described similar woes following the update, including links to a variety of workarounds for a variety of situations. My laptop connects to the router with a static IP, so cases where DHCP mysteriously failed to acquire an address didn't apply to me. I also don't keep my router on a different subnet, so another possibility gone.

Fortunately, in my case I was just able to uninstall my wireless network adapter, in this case a Broadcom BCM43XG, and have Vista reinstall it.


PROCEDURE
  1. Open Device Manager by holding the Windows key and then hitting the Pause key, then clicking the Device Manager link in the upper left corner of the Control Panel => System screen. Alternatively, you can open it using one of the methods outlined here.

  2. Expand the Network Adapters category in the device list, and then right-click on your wireless network adapter (in my case, its display name is listed as "Broadcom 802.11 Network Adapter"), click Uninstall, and then click OK to confirm. If prompted to remove the device driver associated with the network adapter, do not do so. In this case Vista is the problem, not the device driver.

  3. Right-click the entry at the very top of the device list (indicated by your computer's name) and click "Scan for hardware changes". Vista will find and reconfigure the wireless network adapter and should shortly inform you that it's ready for action.

  4. Use either Vista's built-in wireless network management tools, or a third-party utility (in my case, ThinkVantage Access Connections 5), to reconfigure your wireless connection properties (if you aren't already using a wireless security protocol like WPA, I strongly suggest you implement it).

Given the myriad of notebook and wireless configurations out there, it's not at all surprising that a given configuration will not emerge completely intact from a typical Windows service pack install.

In this case, I think that whatever particulars about the configuration of my wireless network adapter, which incidentally has remained much the same since before Vista service pack 1, introduced a monkey wrench which shot out my adapter's knees under service pack 2.


By uninstalling the adapter and then reinstalling it under the updated "device bureaucracy" of Vista service pack 2, this allowed Vista and the adapter to happily coexist once more.

Wednesday, May 14, 2008

Vista Capable, (Not Quite) XP Ready

Problem

So my wife's office has a DELL OPTIPLEX 745 that's having issues. Every few hours its hard drive cooling fan sounds like it's a Pratt & Whitney™ turbojet engine prepping for launch off a convenient flight deck. I checked the BIOS under Maintenance -> Event Log. Saw some colorful error messages such as:

  • Previous shutdown due to thermal event
  • CPU0 fan out of range
  • Her office manager calls Dell. They send one tech, then another. They replace a fan, remove another. The problem recurs. Level 2 tech support engaged, and Dell nicely sends the office a warranty replacement, a DELL OPTIPLEX 755.


    Plan

    Geeks, you know what I'm thinking. This is Dell, this is a 755, a close incremental revision up from the old model. Windows XP Repair Install, baby! Wait a minute, not even that, I could just clone the drive, boot into Safe Mode, a little Device Manager magic and driver download deliciousness and I'll be home free!

    Using the still accessible old PC, I'd attach my external USB hard drive, and use Acronis True Image Home to take a snapshot of the 745's hard drive, then restore it over the top of the 755's. Then, the XP Repair Install to get Windows reacquainted with the hardware, intimately.


    Thwartage

    My initial efforts were thwarted. The symptoms of thwartage included a "quick" BSOD, despite having installed the Intel Matrix Storage Drivers from Dell's support site specific to the 755. These are the type of drivers which you would supply to Windows setup upon hitting the F6 function key when prompted for any third-party drivers to help Windows communicate with hardware that isn't currently supplied on the install disc.

    Immediately upon reboot, the system quickly yielded a BSOD and rebooted. I haven't got photographic memory, but after a few attempts with identical results I caught hint of a driver issue. Whether trying a Normal, Last Known Good, or Safe Mode boot, I got the same result.
    The answer hit me like a pound of bricks (for a ton would just leave a gooey mess for CSI to scratch their heads over).


    Solution

    I entered the BIOS, discovered the Drives -> SATA Operation option, and noticed that Dell had set it by default to AHCI, which according to Wikipedia is Vista-specific. I switched this to plain old ATA which XP is quite fluent in.

    Upon reboot, Windows XP loaded successfully and began acclimating itself to the new hardware. A few additional driver installs for the audio, video, and network and the system was its old self in more time than I'd originally have liked.


    Lessons Learned

    Given the industry strife inspired by Vista, prompting even system builders like Dell to respond to customer demand and offer XP on some of their new desktops, expect that even if your PC, when new, was preloaded with XP, a warranty replacement might be outfitted with newer hardware for a newer world. Not necessarily better, just newer.


    "Why'd the Dell dude get busted? Because pot is a Gateway drug!" - Anonymous