Monday, October 19, 2009

Drive Technology, Make Cars Smarter

I just saw this tragic video detailing the 911 call's final moments of a family whose 2009 Lexus ES350 experienced uncontrolled acceleration, leading to a fatal crash.

According to the original LA Times article, the driver, Mark Saylor, was a veteran California Highway Patrol officer, and a related article states that Saylor and his family "
had taken their own Lexus to a dealer for servicing and been given a loaner Lexus in its place."

I've driven loaner or rental cars for various reasons, either while waiting for my regular ride to be repaired, or for fun, as was the case with a Ford Mustang convertible my wife and I took on a beach trip to St. Augustine. With a new vehicle comes new features. In my case, there was a learning curve in getting to know how to put the Mustang's top down, certainly not for safety's sake, but convenience, and of course fun. I didn't rent the convertible for the privilege of driving a Mustang, despite its heritage (Bullitt fans, represent!).

Should the Saylor family have reasonably been expected to know they'd need to compensate for sudden, uncontrolled acceleration? In my opinion, no; if you're driving a car, you expect it to be fully under your control, especially where speed and drivability are concerned.

If the car has pushbutton ignition as this one does, it seems to raise the bar a bit on what it expects the driver to be able to control. Removing the physical act of turning a key to start or stop the vehicle places the driver into a new paradigm as far as driving is concerned.

As this article regarding Toyota's safety advisory details, the driver must "
firmly and steadily push the button for at least three seconds to turn off the engine".

When I think to myself, could I push and hold my car's start button for three seconds to shut down the engine? Sure, why not? Could I do the same in a panic situation, in the middle of rush-hour traffic? California, specifically Los Angeles rush-hour traffic, trying at once to avoid a collission while at the same time trying to calm my passengers who are probably flipping out as much or more than I am?? Probably not! Therein lies the problem.

I think Toyota would do well to pioneer at least audio and possibly video warnings and introductions to their cars in the rental or loaner role.

If a car is a rental or loaner, perhaps when the driver sits down and buckles in they'd be presented with a little audio-visual presentation on the basic safety features of their vehicle. Only when the user acknowledges and signs off on basic awareness of these features, perhaps by hitting a big OK button on the car nav system's touchscreen or HUD, would they be allowed to actually get on the road.

Of course, given the level of computerization today, you might expect your car to go above and beyond the now trivial "your door is ajar", and do something like, well, prevent the car from entering the runaway acceleration state in the first place.

Why would a car be accelerating uncontrollably for any good reason, particularly in rush hour? If you're a police officer this would be perfectly reasonable to expect, you along with your sirens and flashing lights would weave in and out of traffic at high speed in pursuit of some suspects who have perhaps just robbed a bank or carjacked some poor motorist at a busy intersection. If you're an average joe taking the family out for a cruise, however, there's no reason to expect this, particularly in a rental or loaner.

What should Toyota do to prevent more tragic deaths due to uncontrolled acceleration?
  • TO SAVE LIVES, the car's onboard computer should maintain situational awareness and if necessary disable the engine or otherwise allow the driver to maintain complete control of the vehicle, before an uncontrollable state is reached.

  • TO PROTECT ITSELF, legally, it should enable a rental or loaner "mode" for its vehicles, allowing a dealership or rental company the option of having the car force its driver to OK and acknowledge safety features before allowing the car to be driven.

While I think it is certainly in the scope of driver responsibility to make onself fully aware of a vehicle's basic safety features before driving it, I think it is wholly within the manufacturer's responsibility to make their vehicles smarter.


Friday, October 16, 2009

How To Block New digg.com Ads

Recently, digg has embedded new advertising within its list of news stories, making them easier to click and detracting from what might otherwise be an interesting glance at potentially interesting copy.

You can click Bury to blot the ad out, leaving an "X" and the parting remark, "We'll try to give you fewer ads like that one." Well, gee, how about NO ads instead??

To hide this advertising, you can use Firefox in conjunction with the AdBlock Plus add-on and a companion extension, the Element Hiding Helper.

Here's a screenshot of the digg frontpage with just AdBlock Plus enabled. Note that the third entry from the top is a sponsored ad for weight loss supplements. How annoying!


The Element Hiding Helper lets you seamlessly hide text elements appearing as part of the useful content of the page you're viewing. In this case, the new ad element digg is using is encapsulated by a div tag which resembles this:
     <div rel="digg-ad:xyz" style="z-index: 5;" class="news-summary v img-summary sponsored"> 

I chose to filter the ad based on the rel attribute of the tag, specifically the "digg-ad" portion which is consistent from one of the new digg ads to the next (the xyz is a number which differs with each ad element).

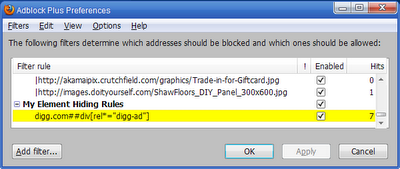
I brought up the AdBlock Plus Preferences, and clicked Add Filter. Then, I input the element syntax like so:

digg.com##div[rel*="digg-ad"]

The digg.com ensures that I'm focusing on filtering these particular elements from digg.com only, while the remaining syntax filters out elements where the rel attribute begins with digg-ad.

Now, the result, no more sponsored ad element:


You'll also notice that in among the preferences list is a new subheading, "My Element Hiding Rules", which are rules specific to hiding elements within the web page itself.


You can find a good explanation here on how to pinpoint and filter elements that you find obscure your browsing experience.

Wednesday, August 12, 2009

One Ring to Rule Them All...

I recently posted an entry on the Cracked.com forums for their photoshop contest, "Movie Plots That Could Have Been Solved In Minutes".

Did I win? Nope. Even make the featured list of entries??! Nope.
Bah!

Here is an unedited version which I'd originally cropped to meet their stingy 550-pixel width requirement.


If you appreciate my sense of humor, I salute you! I raise a virtual mug of mead in your honor!

Wednesday, July 8, 2009

Fake a Floppy That Holds GIGABYTES of "Data"


The venerable 3.5” diskette has become a relic of the past. In high school I remember using them daily to store my documents, images, even some games. Now, system builders will only offer them as an optional peripheral, if at all, in their new computers.

With this little hack you can give that humble little 3.5" disk gathering dust in your closet new life, messing with your friends’ heads a bit in the process. To accomplish this, we use a disk editor to fool Windows into thinking that its file sizes are far from normal!

Stuff you'll need:
  • Windows 2000 / XP / Vista
  • 3.5" disk drive
  • 3.5" diskette
  • a disk editor like Norton DiskEdit

According to this site, your typical 1.44MB, 3.5” floppy can hold up to 224 files in its root directory. What we’ll do first is create 224 tiny text files using a simple batch file.

Create a batch file containing the following line of text in a folder on your C:\ drive, let’s say C:\TEMP. Name the file "MakeFile.BAT" or whatever you like.

FOR /L %%G IN (1, 1, 224) DO ECHO I'm file number %%G. > A:\%%G.txt


Next, open a Command Prompt, change to C:\TEMP, and execute the batch file. After a few minutes, you’ll have 224 separate little .TXT files on the diskette.

Now you need to find a disk editor, which allows you to edit data on a diskette or most any other media at the bit level. For this example I use Norton DiskEdit, a very old but still useful sector editor.

Find yourself a copy of the executable, DISKEDIT.EXE, and save it to C:\TEMP, and then type DISKEDIT and hit Enter. If you’re using Windows 2000 or XP, you’ll likely encounter the following error:

An application has attempted to directly access an incompatible diskette format, which cannot be supported. This may cause the application to function incorrectly. Choose ‘Close’ to terminate the application.


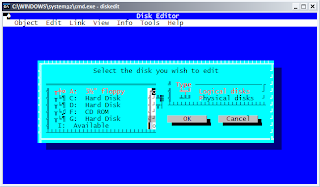
We won’t be looking at the hard drive, so for purposes of this example you can safely click Ignore. From there you should arrive at the main DISKEDIT screen.


My system isn’t rendering this old DOS application’s fonts properly in windowed mode, but regardless you can use the arrow keys to ensure that the ‘3½” floppy’ and ‘Logical disks’ entries are selected and in red. Then, move to highlight the OK button and hit Enter to proceed.

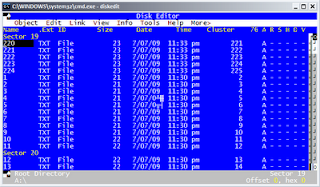
Your diskette drive should whir for a few moments, and one great feature of DISKEDIT will make itself apparent. The next screen will bring you to the FAT of the disk, listing the files you created above.


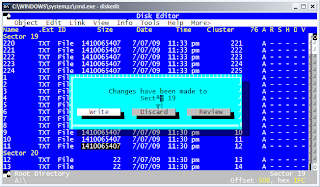
Now, move the black cursor so that it’s hovering under the Size column on the first row, you can use the arrow keys but hitting TAB will be quicker. Type 9999999999 (ten 9s), and then tap the down arrow to move to the next row. You’ll notice that the file size changes from a humble two digits to a value of 1,410,065,407 which is roughly 1.4 gigabytes.

You can proceed to change the sizes of each of the remaining files, from 220 to 11 as listed above. When you tap the arrow key past the last file, you’ll get prompted to Write, Discard, or Review your changes. Arrow over so that Write is selected, then hit Enter.


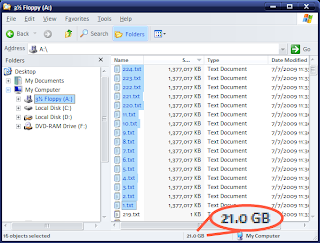
Since DISKEDIT is open, it’s got exclusive access to your diskette. To view our handiwork so far, close the program, and then navigate to the diskette in Windows Explorer. The sixteen files we just modified now show themselves as taking up 21 GB of space.


You can either manually update the size of each file, or use a tool like the excellent (and open-source) AutoHotKey to speed up the process.

In the end, you’ll have a disk which, on the surface, says it’s got around 294 GB of data, but which in actuality contains just a tiny fraction.


Some caveats:
  • The files themselves will be unusable. Try to open them in Notepad, for example, and Windows will complain they're too big.

  • Changes you save to the files will override this hack. Save and overwrite any of the files and they'll revert to their plain old file size according to the file system rules.

  • The fake file size can go beyond 1,410,065,407 bytes apiece. Due to a quirk in Norton Diskedit, instead of ten 9s, you could input ten 7s and have each file be around 3.4 GB instead. I just chose the 9s arbitrarily because 9 is just, well, special. That's all, nothing else. Different disk editors may yield different results, and flexibility.

  • This trick won't fool p2p file sharing programs. I tried a few open-source variants using the DC++ protocol and each balked at the disk, wanting to have Windows run CHKDSK to fix the "errors". You'll just have to share those 500 GB of data the hard way to gain access to those l33t servers in Sweden, unless you know of a way to "cloak" the diskette's true nature from the application and the operating system.