Wednesday, August 12, 2009
One Ring to Rule Them All...
Did I win? Nope. Even make the featured list of entries??! Nope. Bah!
Here is an unedited version which I'd originally cropped to meet their stingy 550-pixel width requirement.
If you appreciate my sense of humor, I salute you! I raise a virtual mug of mead in your honor!
Wednesday, July 8, 2009
Fake a Floppy That Holds GIGABYTES of "Data"

The venerable 3.5” diskette has become a relic of the past. In high school I remember using them daily to store my documents, images, even some games. Now, system builders will only offer them as an optional peripheral, if at all, in their new computers.
With this little hack you can give that humble little 3.5" disk gathering dust in your closet new life, messing with your friends’ heads a bit in the process. To accomplish this, we use a disk editor to fool Windows into thinking that its file sizes are far from normal!
Stuff you'll need:
- Windows 2000 / XP / Vista
- 3.5" disk drive
- 3.5" diskette
- a disk editor like Norton DiskEdit
According to this site, your typical 1.44MB, 3.5” floppy can hold up to 224 files in its root directory. What we’ll do first is create 224 tiny text files using a simple batch file.
Create a batch file containing the following line of text in a folder on your C:\ drive, let’s say C:\TEMP. Name the file "MakeFile.BAT" or whatever you like.
FOR /L %%G IN (1, 1, 224) DO ECHO I'm file number %%G. > A:\%%G.txt
Next, open a Command Prompt, change to C:\TEMP, and execute the batch file. After a few minutes, you’ll have 224 separate little .TXT files on the diskette.
Now you need to find a disk editor, which allows you to edit data on a diskette or most any other media at the bit level. For this example I use Norton DiskEdit, a very old but still useful sector editor.
Find yourself a copy of the executable, DISKEDIT.EXE, and save it to C:\TEMP, and then type DISKEDIT and hit Enter. If you’re using Windows 2000 or XP, you’ll likely encounter the following error:
“An application has attempted to directly access an incompatible diskette format, which cannot be supported. This may cause the application to function incorrectly. Choose ‘Close’ to terminate the application.”
We won’t be looking at the hard drive, so for purposes of this example you can safely click Ignore. From there you should arrive at the main DISKEDIT screen.
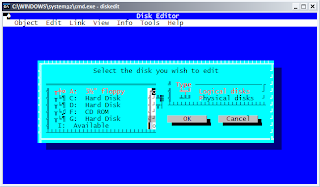
My system isn’t rendering this old DOS application’s fonts properly in windowed mode, but regardless you can use the arrow keys to ensure that the ‘3½” floppy’ and ‘Logical disks’ entries are selected and in red. Then, move to highlight the OK button and hit Enter to proceed.
Your diskette drive should whir for a few moments, and one great feature of DISKEDIT will make itself apparent. The next screen will bring you to the FAT of the disk, listing the files you created above.
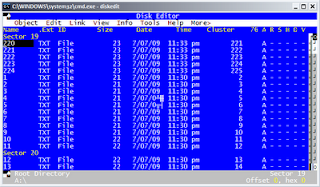
Now, move the black cursor so that it’s hovering under the Size column on the first row, you can use the arrow keys but hitting TAB will be quicker. Type 9999999999 (ten 9s), and then tap the down arrow to move to the next row. You’ll notice that the file size changes from a humble two digits to a value of 1,410,065,407 which is roughly 1.4 gigabytes.
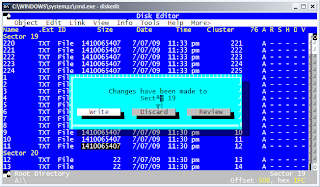
You can proceed to change the sizes of each of the remaining files, from 220 to 11 as listed above. When you tap the arrow key past the last file, you’ll get prompted to Write, Discard, or Review your changes. Arrow over so that Write is selected, then hit Enter.
Since DISKEDIT is open, it’s got exclusive access to your diskette. To view our handiwork so far, close the program, and then navigate to the diskette in Windows Explorer. The sixteen files we just modified now show themselves as taking up 21 GB of space.
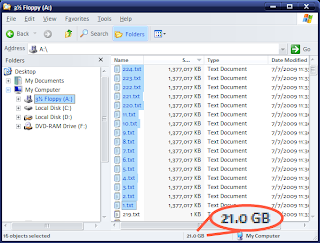
You can either manually update the size of each file, or use a tool like the excellent (and open-source) AutoHotKey to speed up the process.
In the end, you’ll have a disk which, on the surface, says it’s got around 294 GB of data, but which in actuality contains just a tiny fraction.
Some caveats:
- The files themselves will be unusable. Try to open them in Notepad, for example, and Windows will complain they're too big.
- Changes you save to the files will override this hack. Save and overwrite any of the files and they'll revert to their plain old file size according to the file system rules.
- The fake file size can go beyond 1,410,065,407 bytes apiece. Due to a quirk in Norton Diskedit, instead of ten 9s, you could input ten 7s and have each file be around 3.4 GB instead. I just chose the 9s arbitrarily because 9 is just, well, special. That's all, nothing else. Different disk editors may yield different results, and flexibility.
- This trick won't fool p2p file sharing programs. I tried a few open-source variants using the DC++ protocol and each balked at the disk, wanting to have Windows run CHKDSK to fix the "errors". You'll just have to share those 500 GB of data the hard way to gain access to those l33t servers in Sweden, unless you know of a way to "cloak" the diskette's true nature from the application and the operating system.
Saturday, May 30, 2009
No Internet After Installing Vista SP2
Upon rebooting, I was able to connect to other XP machines on my LAN, but not the internet.

I found a helpful newsgroup post where some other users described similar woes following the update, including links to a variety of workarounds for a variety of situations. My laptop connects to the router with a static IP, so cases where DHCP mysteriously failed to acquire an address didn't apply to me. I also don't keep my router on a different subnet, so another possibility gone.
Fortunately, in my case I was just able to uninstall my wireless network adapter, in this case a Broadcom BCM43XG, and have Vista reinstall it.
- Open Device Manager by holding the Windows key and then hitting the Pause key, then clicking the Device Manager link in the upper left corner of the Control Panel => System screen. Alternatively, you can open it using one of the methods outlined here.
- Expand the Network Adapters category in the device list, and then right-click on your wireless network adapter (in my case, its display name is listed as "Broadcom 802.11 Network Adapter"), click Uninstall, and then click OK to confirm. If prompted to remove the device driver associated with the network adapter, do not do so. In this case Vista is the problem, not the device driver.
- Right-click the entry at the very top of the device list (indicated by your computer's name) and click "Scan for hardware changes". Vista will find and reconfigure the wireless network adapter and should shortly inform you that it's ready for action.
- Use either Vista's built-in wireless network management tools, or a third-party utility (in my case, ThinkVantage Access Connections 5), to reconfigure your wireless connection properties (if you aren't already using a wireless security protocol like WPA, I strongly suggest you implement it).
In this case, I think that whatever particulars about the configuration of my wireless network adapter, which incidentally has remained much the same since before Vista service pack 1, introduced a monkey wrench which shot out my adapter's knees under service pack 2.
By uninstalling the adapter and then reinstalling it under the updated "device bureaucracy" of Vista service pack 2, this allowed Vista and the adapter to happily coexist once more.
Thursday, May 21, 2009
Friday, March 20, 2009
Transferring Files from an OLD Mac to a PC
"Sure!" I replied, enthusiastically. Little did I know the ordeal that was to come. Now, at least, I've learned from it and can spread the word to other PC people who might've had a Mac dropped in their midst.
I plugged in the old PowerBook's clunky AC adapter and eventually found the power switch on the left-rear panel. The cheesy "BOM BOMMMMM…" greeting tone came through, so far, so good. A grayscale image eventually flickered into view.
I don't know whether the display was responding to solar flares, unclean power, or sketchy connectors from the motherboard to the screen, but it took some effort to get the image to remain stable. The backlight appeared to be on its way out, like one of those ubiquitous fluorescent bulbs in a school or office that's started its death flickers. My initial idea was simply to offload the documents via the PowerBook's 3.5" diskette drive, so caveman-like, I grabbed up a handy diskette, plenty of which I have gathering dust in my desk drawer, and managed to single-click my way to formatting the diskette.

Sadly this was nixed by what the Mac reported as at least several dozen MB of documents and images on its hard drive. Worse, neither network nor USB nor writeable CD were an option with this old Mac.
Undaunted, I flipped off the PowerBook in disgust, then unplugged the sucker and let it sit on a table in my room while other more pressing, and interesting, things took up my time.
Weeks, then months, passed by. Yesterday I revisit the PowerBook, now a fine layer of dust and dog hair adorning its gray exterior. I pick it up and notice the power plug sticking out of the right-rear panel is askew for some reason. I yank the plug out and the metal sleeve is bent at around a 45-degree angle. Whoops! I probably carelessly bumped into it at some point, popping the thing.
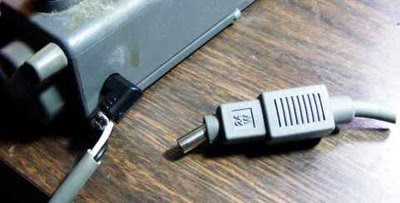
I try plugging the AC adapter in, then try carefully squeezing the sleeve back into place, and try working it around like a Q-Tip™ to see if I can get any power. Nope. I try realigning the sleeve again and notice that it's for naught, because the sleeve has been completely sheared away from the rest of the plug assembly.
Clearly if I'm going to get power to this clunker, I need to replace the plug. I dig around my collection of old and unused AC adapters, refugees from years of electronics equipment gone astray, lost to lightning strikes, or given away or sold with the wrong adapter in the package, separating the two forever.
I find one possible candidate, an old AC adapter from a 2400 baud modem, with a similarly shaped plug. I slice off the plug, slice away the broken Apple plug, and splice the replacement, then apply power. No dice!
Frustrated, I start digging around in a drawer where I keep anything from old greeting cards to duct tape to spare change. I find a strip of plugs from a universal AC adapter which has gone AWOL, each has two metal pins which are meant to plug in to a socket in the adapter’s cable. At this point I don’t care about a clean fit, so I grab the largest of the plugs and then go ahead and strip the wires from the Apple adapter and solder them to the pins. Incidentally, I have no idea off hand which is positive and which is negative, but as it happens when I get frustrated, I get impatient, so I opted to take the 50/50 shot at blowing something up.
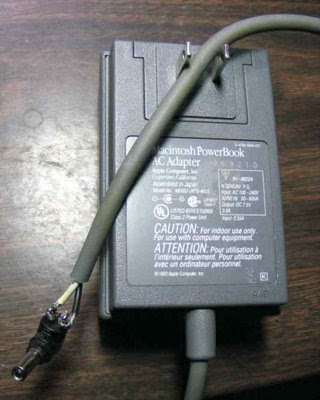
Success, the annoying "BOM BOMMMMM…" smacks my eardrums!
Now I start poking around on the Mac to try to gather up all the files and compress them. Documents in general are notoriously compressible, so I figure I can get at least a good 70-80% compression on average. The problem, unlike Windows XP, with its default “Send to Compressed File” context menu option from Explorer, this System 7.0.1 doesn’t seem to have any way to compress files, let alone right-click. There is a StuffIt Expander 4.0.1 installed, but it only uncompresses.
Unperturbed, I set out in search of a compression utility. I checked out the latest version of StuffIt, but it requires the latest and greatest MacOS. I took a quick look, they didn’t seem to have download links for prior versions readily available. I searched around and found references to DropStuff 4.0.1, StuffIt Expander’s counterpart, which would enable me to gasp compress files and folders.
Of course, the StuffIt site didn’t have this file available, so I visited some FTP search sites, ending up finally at FileWatcher. A forum thread I came upon actually had a post where a user had mentioned the name of an .HQX file, dropstuff_w_ee_4_installer.hqx, which is basically the equivalent of a SETUP.EXE file in Windows. This is what I needed.
FileWatcher provided me with a suitable FTP site hosting the file, so I grabbed it, and on a freshly-formatted diskette, copied the .HQX file. I then inserted the diskette into the Mac’s drive and attempted to execute what should be an executable. I get this error message:
The document could not be opened because the application program that created it could not be found.
So let me get this straight, it’s an executable which can’t be executed, because the Mac tried and failed to find an application associated with it? Strange, too, was the fact that the DropStuff installer icon itself was plain, as if symbolic of an unknown file type. Did the Mac just not know what to do with this file? Did I grab a version of DropStuff which somehow was unreadable by this version of the System OS?
I decided to fall back and punt. I took a break, got a tasty beverage, then did some more research. It turned out that I had naively taken a blurb I’d heard years ago about Macs being able to read PC-formatted disks too seriously. It turned out not to work quite so seamlessly.
Eventually I found and installed the handy utility TransMac which enables Mac and PC files to be transferred from their respective media. Once I used this utility to create a Mac-formatted diskette on my PC, then copied the DropStuff installer to it, I found to my relief that when I inserted the diskette into the Mac, its own pixellated little icon appeared. When I clicked twice on the icon, an installer opened and began the installation process. At last, I was able to use DropStuff to systematically grab and compress my pal Don’s documents, copy them to diskette, and with TransMac as my Mac-to-PC ambassador, copy the resulting .SIT files to a folder on my PC.
I finally found and installed an old but Windows-compatible version 5 of the StuffIt suite to enable me to uncompress the document files on my Windows machine and migrate them to a writeable CD.
PROCEDURE
- Install TransMac on the Windows computer.
- Use TransMac to format a Mac diskette.
- Locate a file with an .HQX extension for a Mac version of DropStuff or a similar compression utility.
- Copy the .HQX file to diskette using TransMac.
- Install DropStuff on the Mac.
- Use DropStuff to compress files and folders, and copy them from Mac to diskette.
- Copy files from diskette to PC using TransMac.
- Install a Windows version of StuffIt, and use this to uncompress the .SIT files containing the migrated document files.
Aside from the PowerBook’s annoying lack of a simple eject button to pop the diskette out of the Mac, instead depending on the quaint user interface option of “Put Away” to get it back, things went pretty smoothly! Now this Mac can go into the dark night of the technology graveyard as many things have and will continue to do.
Monday, March 9, 2009
Top 10 List on 10 Separate Pages?? Uhhh... NO.
Increasingly, to get their advertising exposed to as many eyes as possible, content publishers will take anything from a howto article to a top 10 list and break it into individual pages. I think mainly the purpose of this is increase the CPM, which is understandable if someone is publishing content for purposes of earning some money.
Another reason for doing this is to try to regulate how much bandwidth is consumed in viewing the site. One user gobbling up 1 item of a top 10 list at a time uses less bandwidth than a user grabbing all 10 items at once. This is certainly a concern particularly for a forum which might be running with an ISP which charges for monthly bandwidth overage. However, some sites like Something Awful will do stuff like charge users a one-time fee for the privilege of searching their forum. While this is understandable, I find it annoying.
Say you have a favorite thread on a forum which is huge, but unfortunately only shows a set limit of posts per page. This add-on lets you bypass the site's limitation, and lets you consolidate all the posts into a single, huge web document.
In the screenshot below, by right-clicking on the Next link, a Repagination popup menu is present, and the "All" option I choose lets me append to the current page all subsequent pages of the forum thread.

In this example, a thread which is several hundred pages long can, if I like, be loaded en masse in a single browser window. At that point, I can easily search it for references, in this case, to artists or songs I like, or just save the whole mess for viewing later on a laptop if I happen to be somewhere without wireless connectivity (a situation which is becoming increasingly infrequent).
While the popularity of this kind of add-on certainly will open the floodgates as far as your ability to gobble up more of a content publisher's bandwidth at one time, it also will and arguably should send the message that informed users can and will get around attempts to spoon-feed content and advertising to them.
Although this add-on hasn't been updated recently, someone posted an update to this extension here which makes it compatible with Firefox 3.x. I hope that the author will consider an update of his own, I find it an incredibly helpful and useful add-on!
Wednesday, February 18, 2009
When MAX Isn't - Getting the Maximum Value of a VARCHAR Field
The particulars of the (somewhat convoluted) balance calculation aren't terribly exciting, but in a nutshell, a part of the process involves grabbing the most recent customer invoice by its InvoiceNumber, and using a value associated with that invoice to perform other calculations which eventually lead to the account balance.
This is a list of the customer's InvoiceNumber values, in descending order as they appear in the Invoices table.
SELECT InvoiceNumber
FROM Invoices
WHERE AccountKey = '99432'
ORDER BY InvoiceNumber DESC

12345678900902
12345678900901
1234567890507
1234567890506
1234567890505
AccountKey represents a foreign key in the Invoices table representing the customer account. Notice that the result set shows the most recent Invoice at the top of the list, and since the primary key for the Invoices table is auto-incrementing, that invoice possesses the largest key value.
Some years back, a data fix was made to this table whereby the customer account number (in this case, 1234567890) was changed to add an additional digit. Thus, what was once 1234567890 became 12345678900.
Time went by. In the last couple of months, a different data fix was made to a piece of code responsible for calculating account balances, specifically late fee calculations. This turned out to be the crux of the matter, as you'll see here.
The code which calculates the account balance, as I mentioned, needs to obtain the customer's most recent InvoiceNumber. The code used to grab this had been modified to add this section of code as follows:
SELECT MAX(InvoiceNumber)
FROM Invoices
WHERE AccountKey = '99432'

1234567890507
Take a look at the position of this InvoiceNumber in the actual list:
12345678900902
12345678900901
1234567890507
1234567890506
1234567890505
Rhut rho! There's the problem. The InvoiceNumber field is of the SQL data type varchar, and consequently the MAX function is returning what is alphanumerically the largest value, when in fact numerically the one at the top of the list should be returned instead. This resulted in the wrong InvoiceNumber being grabbed as part of the late fee calculation, and this further led to a certain balance threshold not being exceeded, which then altered the balance from what it needs to be.
The fix is easy, just CAST the InvoiceNumber to a decimal within the MAX function.
SELECT MAX(CAST(InvoiceNumber AS decimal(18,0))
FROM Invoices
WHERE AccountKey = '99432'

12345678900902
Modifying this code allowed the process to properly obtain and work with the most recent InvoiceNumber. You might be asking, why not just avoid the hassle, and grab the MAX of the Invoices table's primary key for the given AccountKey value? That would certainly make more sense, and would be more efficient, after all, the primary key field for the Invoices table is an integer, not a varchar(25) like the InvoiceNumber.
However, the code which does the calculations is outside my normal scope, so rather than modify someone else's handiwork to the extent I'd prefer, I'm opting for a less invasive change which will compensate for whatever necessitates getting the InvoiceNumber directly. In resolving this issue, I've left detailed commentary in the work order on our internal helpdesk system, so that whomever stumbles across this code in future will have a point of reference.
Friday, January 2, 2009
Extend Existing XML Parsing to Support Multiple Child Tags
I'd prefer to refactor the plumbing which generates the XML in the remote stored procedure so that I can take advantage of the new XML data type in 2005, which would allow me to simply pass the XML as a parameter to my stored proc, but unfortunately time is of the essence, so I need to develop an alternative which doesn't involve refactoring to that extent.
The current XML resembles the following:
<XML>
  <AccountInfo
      Number="123456789"
      Status="Active"
      Region="SE" />
</XML>
The new XML will look like this:
<XML>
   <AccountInfo
        Number="123456789"
        Status="Active"
        Region="SE" />
   <State>
        <StateInfo
             Name="Florida"
             Population="9488294"
             AreaSquareMiles="58560"
             LandAreaSquareMiles="54252"
             WaterAreaSquareMiles="4308" />
        <County
             Name="Alachua"
             Population="277120" />
        <County
             Name="Union"
             Population="14842" />
   </State>
</XML>
The stored procedure which I need to modify for my project receives the pointer to the XML document, @idoc, and after extracting values from it makes various other calls to other stored procs.
A new State element is being added, with a child StateInfo element that describes the state in question, and any number of child County elements describing counties in that state. In other words, this XML describes an account, the state it operates in, and however many counties the state contains which are relevant to a given account.
My major challenge with this is in the form of the new County tags. Whereas previously there would only ever be a single instance of any particular tag in this XML, there could potentially be dozens of County tags associated with a given State for an account! For each County I need to be able to iterate through the collection and provide these details somehow to my stored procedure for further processing.
My work is pretty well cut out for me. I need to find a way to:
- Rebuild the XML document using the @idoc as a reference.
- Grab the new XML specific to each County tag and serialize the values.
DECLARE @TestXML varchar(4000)
DECLARE @idoc int

SET @TestXML = '<XML>
   <AccountInfo
       Number="123456789"
       Status="Active"
       Region="SE" />
    <State>
         <StateInfo
              Name="Florida"
              Population="9488294"
              AreaSquareMiles="58560"
              LandAreaSquareMiles="54252"
              WaterAreaSquareMiles="4308" />
         <County
              Name="Alachua"
              Population="277120" />
         <County
              Name="Union"
              Population="14842" />
    </State>
</XML>'

EXEC sp_xml_preparedocument @idoc OUTPUT, @TestXML
At this point, @idoc is a reference to an accurate representation of the XML structure my stored proc will receive and process.
As I mentioned, the code outside of the scope of my stored proc is SQL 2000 based, but that doesn’t mean I can’t use some of the great new capabilities in 2005 in my code. Thus, here I use the OPENXML command to crack open the XML, in conjunction with the FOR XML PATH directive to build the XML structure.
-- First build the XML to give @idoc a reason to live.
EXEC sp_xml_preparedocument @idoc OUTPUT, @TestXML

SELECT
(
    SELECT Number, Status, Region
    FROM OPENXML(@idoc, '/XML/AccountInfo', 1) WITH (
         Number int,
         Status varchar(100),
         Region varchar(2)
    ) AS StateInfo FOR XML PATH('AccountInfo'), Type
),
(
    SELECT
    (
         SELECT Name,
         Population,
         AreaSquareMiles,
         LandAreaSquareMiles,
         WaterAreaSquareMiles
         FROM OPENXML(@idoc, '/XML/StateInfo', 1) WITH (
              Name varchar(100),
              Population int,
              AreaSquareMiles int,
              LandAreaSquareMiles int,
              WaterAreaSquareMiles int
         ) AS StateInfo FOR XML PATH('StateInfo'), Type
    ),

    (
         SELECT Name,
         Population
         FROM OPENXML(@idoc, '/XML/County', 1) WITH (
              Name varchar(100),
              Population int
         ) AS County FOR XML PATH('County'), Type
    )
    FOR XML PATH('State'), Type
)
FOR XML PATH('XML')

-- Eliminate the document.
EXEC sp_xml_removedocument @idoc
Here is the output from execution of the above code. I’m done… right??
<XML>
 <AccountInfo>
   <Number>123456789</Number>
   <Status>Active</Status>
   <Region>SE</Region>
 </AccountInfo>
 <State>
   <StateInfo>
     <Name>Florida</Name>
     <Population>9488294</Population>
     <AreaSquareMiles>58560</AreaSquareMiles>
     <LandAreaSquareMiles>54252</LandAreaSquareMiles>
     <WaterAreaSquareMiles>4308</WaterAreaSquareMiles>
   </StateInfo>
   <County>
     <Name>Alachua</Name>
     <Population>277120</Population>
   </County>
   <County>
     <Name>Union</Name>
     <Population>14842</Population>
   </County>
 </State>
</XML>
Hmmm, not quite. Notice that there are separate tags beneath AccountInfo, StateInfo and County. Whereas my prototype XML has the values under these tags in the form of XML attributes, they appear here as tags. Not good!
I found an article by Jerry Dixon which led me to the answer. I just needed to take each item in my SELECT statements and use AS ‘@<attributeName>
EXEC sp_xml_preparedocument @idoc OUTPUT, @TestXML

SELECT
(
   SELECT Number AS '@Number',
   Status AS '@Status',
   Region AS '@Region'
   FROM OPENXML(@idoc, '/XML/AccountInfo', 1) WITH (
       Number int,
       Status varchar(100),
       Region varchar(2)
   ) AS StateInfo FOR XML PATH('AccountInfo'), Type
),

(
   SELECT Name AS '@Name',
   Population AS '@Population',
   AreaSquareMiles AS '@AreaSquareMiles',
   LandAreaSquareMiles AS '@LandAreaSquareMiles',
   WaterAreaSquareMiles AS '@WaterAreaSquareMiles'
   FROM OPENXML(@idoc, '/XML/State/StateInfo', 1) WITH (
       Name varchar(100),
       Population int,
       AreaSquareMiles int,
       LandAreaSquareMiles int,
       WaterAreaSquareMiles int
   ) AS StateInfo FOR XML PATH('StateInfo'), Type
),

(
   SELECT Name AS '@Name',
   Population AS '@Population'
   FROM OPENXML(@idoc, '/XML/State/County', 1) WITH (
       Name varchar(100),
       Population int
   ) AS County FOR XML PATH('County'), Type
)

FOR XML PATH('XML')

EXEC sp_xml_removedocument @idoc
Now my rebuilt representation of the original XML document, reconstructed using @idoc as a reference, is just the way I need it to be:
<XML>
 <AccountInfo Number="123456789" Status="Active" Region="SE" />
 <State>
   <StateInfo
      Name="Florida"
      Population="9488294"
      AreaSquareMiles="58560"
      LandAreaSquareMiles="54252"
      WaterAreaSquareMiles="4308" />
   <County Name="Alachua" Population="277120" />
   <County Name="Union" Population="14842" />
 </State>
</XML>
The next requirement, how to serialize only the County values tied to each account? I can use some of the code which reconstructs the County nodes, above, and omit the AS and FOR XML PATH(‘County’), Type syntax so that a result set rather than XML is returned:
   SELECT Name, Population
   FROM OPENXML(@idoc, '/XML/State/County', 1) WITH (
       Name varchar(100),
       Population int
   )
Here’s the result set output by the SELECT:
   Name          Population

   Alachua           277120
   Union              14842
I defined a table variable to hold the County values, along with its own autoincrementing ID (just because it’s handy to have a unique identifier for other stuff happening in my stored proc).
DECLARE @County TABLE
(
   ID int IDENTITY (1, 1) PRIMARY KEY NOT NULL,
   Name varchar(100),
   Population int
)
Finally, I populate the table variable with the County data I extract from the XML:
INSERT INTO @County (Name, Population)
   SELECT Name, Population
   FROM OPENXML(@idoc, '/XML/State/County', 1) WITH (
       Name varchar(100),
       Population int
)
In summary, I’ve created code which extends the stored procedure so that it can handle multiple instances of a tag, whereas previously it was built to expect only a single instance of each tag. This enables me to properly recombobulate, if you will, the original XML passed by reference from a remote stored proc, then serialize all instances of the new tag and mess with them elsewhere in my code.
___
Special thanks to Greg Houston and his article Format My Source Code For Blogging which helped me compensate for difficulties I had with formatting my code.

