I recently posted an entry on the Cracked.com forums for their photoshop contest, "Movie Plots That Could Have Been Solved In Minutes".
Did I win? Nope. Even make the featured list of entries??! Nope. Bah!
Here is an unedited version which I'd originally cropped to meet their stingy 550-pixel width requirement.
If you appreciate my sense of humor, I salute you! I raise a virtual mug of mead in your honor!
Wednesday, August 12, 2009
Wednesday, July 8, 2009
Fake a Floppy That Holds GIGABYTES of "Data"
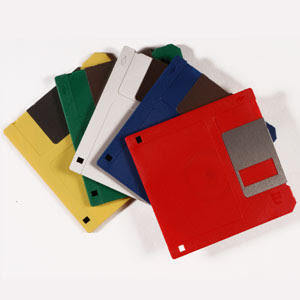
The venerable 3.5” diskette has become a relic of the past. In high school I remember using them daily to store my documents, images, even some games. Now, system builders will only offer them as an optional peripheral, if at all, in their new computers.
With this little hack you can give that humble little 3.5" disk gathering dust in your closet new life, messing with your friends’ heads a bit in the process. To accomplish this, we use a disk editor to fool Windows into thinking that its file sizes are far from normal!
Stuff you'll need:
- Windows 2000 / XP / Vista
- 3.5" disk drive
- 3.5" diskette
- a disk editor like Norton DiskEdit
According to this site, your typical 1.44MB, 3.5” floppy can hold up to 224 files in its root directory. What we’ll do first is create 224 tiny text files using a simple batch file.
Create a batch file containing the following line of text in a folder on your C:\ drive, let’s say C:\TEMP. Name the file "MakeFile.BAT" or whatever you like.
FOR /L %%G IN (1, 1, 224) DO ECHO I'm file number %%G. > A:\%%G.txt
Next, open a Command Prompt, change to C:\TEMP, and execute the batch file. After a few minutes, you’ll have 224 separate little .TXT files on the diskette.
Now you need to find a disk editor, which allows you to edit data on a diskette or most any other media at the bit level. For this example I use Norton DiskEdit, a very old but still useful sector editor.
Find yourself a copy of the executable, DISKEDIT.EXE, and save it to C:\TEMP, and then type DISKEDIT and hit Enter. If you’re using Windows 2000 or XP, you’ll likely encounter the following error:
“An application has attempted to directly access an incompatible diskette format, which cannot be supported. This may cause the application to function incorrectly. Choose ‘Close’ to terminate the application.”
We won’t be looking at the hard drive, so for purposes of this example you can safely click Ignore. From there you should arrive at the main DISKEDIT screen.
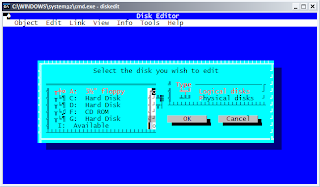
My system isn’t rendering this old DOS application’s fonts properly in windowed mode, but regardless you can use the arrow keys to ensure that the ‘3½” floppy’ and ‘Logical disks’ entries are selected and in red. Then, move to highlight the OK button and hit Enter to proceed.
Your diskette drive should whir for a few moments, and one great feature of DISKEDIT will make itself apparent. The next screen will bring you to the FAT of the disk, listing the files you created above.
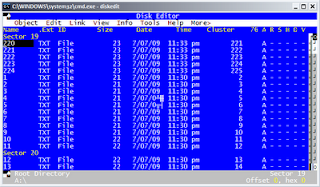
Now, move the black cursor so that it’s hovering under the Size column on the first row, you can use the arrow keys but hitting TAB will be quicker. Type 9999999999 (ten 9s), and then tap the down arrow to move to the next row. You’ll notice that the file size changes from a humble two digits to a value of 1,410,065,407 which is roughly 1.4 gigabytes.
You can proceed to change the sizes of each of the remaining files, from 220 to 11 as listed above. When you tap the arrow key past the last file, you’ll get prompted to Write, Discard, or Review your changes. Arrow over so that Write is selected, then hit Enter.
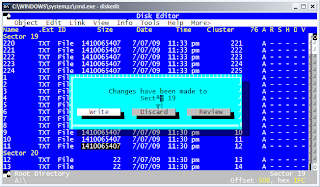
Since DISKEDIT is open, it’s got exclusive access to your diskette. To view our handiwork so far, close the program, and then navigate to the diskette in Windows Explorer. The sixteen files we just modified now show themselves as taking up 21 GB of space.
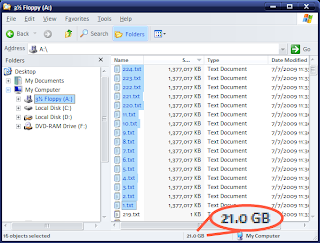
You can either manually update the size of each file, or use a tool like the excellent (and open-source) AutoHotKey to speed up the process.
In the end, you’ll have a disk which, on the surface, says it’s got around 294 GB of data, but which in actuality contains just a tiny fraction.
Some caveats:
- The files themselves will be unusable. Try to open them in Notepad, for example, and Windows will complain they're too big.
- Changes you save to the files will override this hack. Save and overwrite any of the files and they'll revert to their plain old file size according to the file system rules.
- The fake file size can go beyond 1,410,065,407 bytes apiece. Due to a quirk in Norton Diskedit, instead of ten 9s, you could input ten 7s and have each file be around 3.4 GB instead. I just chose the 9s arbitrarily because 9 is just, well, special. That's all, nothing else. Different disk editors may yield different results, and flexibility.
- This trick won't fool p2p file sharing programs. I tried a few open-source variants using the DC++ protocol and each balked at the disk, wanting to have Windows run CHKDSK to fix the "errors". You'll just have to share those 500 GB of data the hard way to gain access to those l33t servers in Sweden, unless you know of a way to "cloak" the diskette's true nature from the application and the operating system.
Saturday, May 30, 2009
No Internet After Installing Vista SP2
I'd just noticed Vista service pack 2 had become available via Automatic Updates, and decided to take the plunge and update my Lenovo N100 laptop.
Upon rebooting, I was able to connect to other XP machines on my LAN, but not the internet.
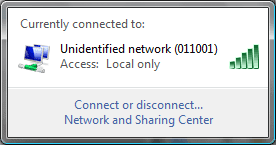
I found a helpful newsgroup post where some other users described similar woes following the update, including links to a variety of workarounds for a variety of situations. My laptop connects to the router with a static IP, so cases where DHCP mysteriously failed to acquire an address didn't apply to me. I also don't keep my router on a different subnet, so another possibility gone.
Fortunately, in my case I was just able to uninstall my wireless network adapter, in this case a Broadcom BCM43XG, and have Vista reinstall it.
In this case, I think that whatever particulars about the configuration of my wireless network adapter, which incidentally has remained much the same since before Vista service pack 1, introduced a monkey wrench which shot out my adapter's knees under service pack 2.
By uninstalling the adapter and then reinstalling it under the updated "device bureaucracy" of Vista service pack 2, this allowed Vista and the adapter to happily coexist once more.
Upon rebooting, I was able to connect to other XP machines on my LAN, but not the internet.

I found a helpful newsgroup post where some other users described similar woes following the update, including links to a variety of workarounds for a variety of situations. My laptop connects to the router with a static IP, so cases where DHCP mysteriously failed to acquire an address didn't apply to me. I also don't keep my router on a different subnet, so another possibility gone.
Fortunately, in my case I was just able to uninstall my wireless network adapter, in this case a Broadcom BCM43XG, and have Vista reinstall it.
PROCEDURE
- Open Device Manager by holding the Windows key and then hitting the Pause key, then clicking the Device Manager link in the upper left corner of the Control Panel => System screen. Alternatively, you can open it using one of the methods outlined here.
- Expand the Network Adapters category in the device list, and then right-click on your wireless network adapter (in my case, its display name is listed as "Broadcom 802.11 Network Adapter"), click Uninstall, and then click OK to confirm. If prompted to remove the device driver associated with the network adapter, do not do so. In this case Vista is the problem, not the device driver.
- Right-click the entry at the very top of the device list (indicated by your computer's name) and click "Scan for hardware changes". Vista will find and reconfigure the wireless network adapter and should shortly inform you that it's ready for action.
- Use either Vista's built-in wireless network management tools, or a third-party utility (in my case, ThinkVantage Access Connections 5), to reconfigure your wireless connection properties (if you aren't already using a wireless security protocol like WPA, I strongly suggest you implement it).
In this case, I think that whatever particulars about the configuration of my wireless network adapter, which incidentally has remained much the same since before Vista service pack 1, introduced a monkey wrench which shot out my adapter's knees under service pack 2.
By uninstalling the adapter and then reinstalling it under the updated "device bureaucracy" of Vista service pack 2, this allowed Vista and the adapter to happily coexist once more.
Thursday, May 21, 2009
Subscribe to:
Posts (Atom)
